Monday, November 22, 2010

Mom's Peanut Butter Balls


All right, all right.... so it doesn't involve baking. But I do expand my horizons to candy making and other general dessert goodness, so there.

While nothing about these candies scream "Christmas" these are a holiday goodie to me, because as long as I remember my mom would make mountains of them every December. My brothers and I would be there in the kitchen rolling and dipping (and eating, of course) for hours. We wouldn't have a spare cookie sheet or pizza pan in the house, and every bit of fridge space was taken over with precariously balanced sheets of candies. They're easy to put together, though a tad time consuming, and they're generally well received by the multitudes. If you like peanut butter and chocolate, you'll love these.

Mom's Peanut Butter Balls

1 lb Butter, melted
18 oz Creamy Peanut Butter
9 1/2 oz Powdered Sugar
2 14.4 oz boxes Graham Crackers (Honey flavored)
24 oz Semi-Sweet Chocolate Chips
2 tbsp Vegetable Oil


Yes, a whole pound of butter. Disclaimer: These are not good for you.

Crush the graham crackers into fine crumbs. The easiest way is in a food processor, I do about a package (1/3 of a box) at a time, break into somewhat even pieces and then just let it run. A few chunks won't hurt anything, but the finer the crumb the smoother the consistency of the finished candy. Also, larger crumbs won't absorb as much liquid and could lead to a runny mixture, needing some extra crumbs to thicken it up. My mom was old-school and always did it with wax paper and a rolling pin, and by the end of the day she'd get tired and wouldn't crush them as much as the first batches, and they were never as good of quality.


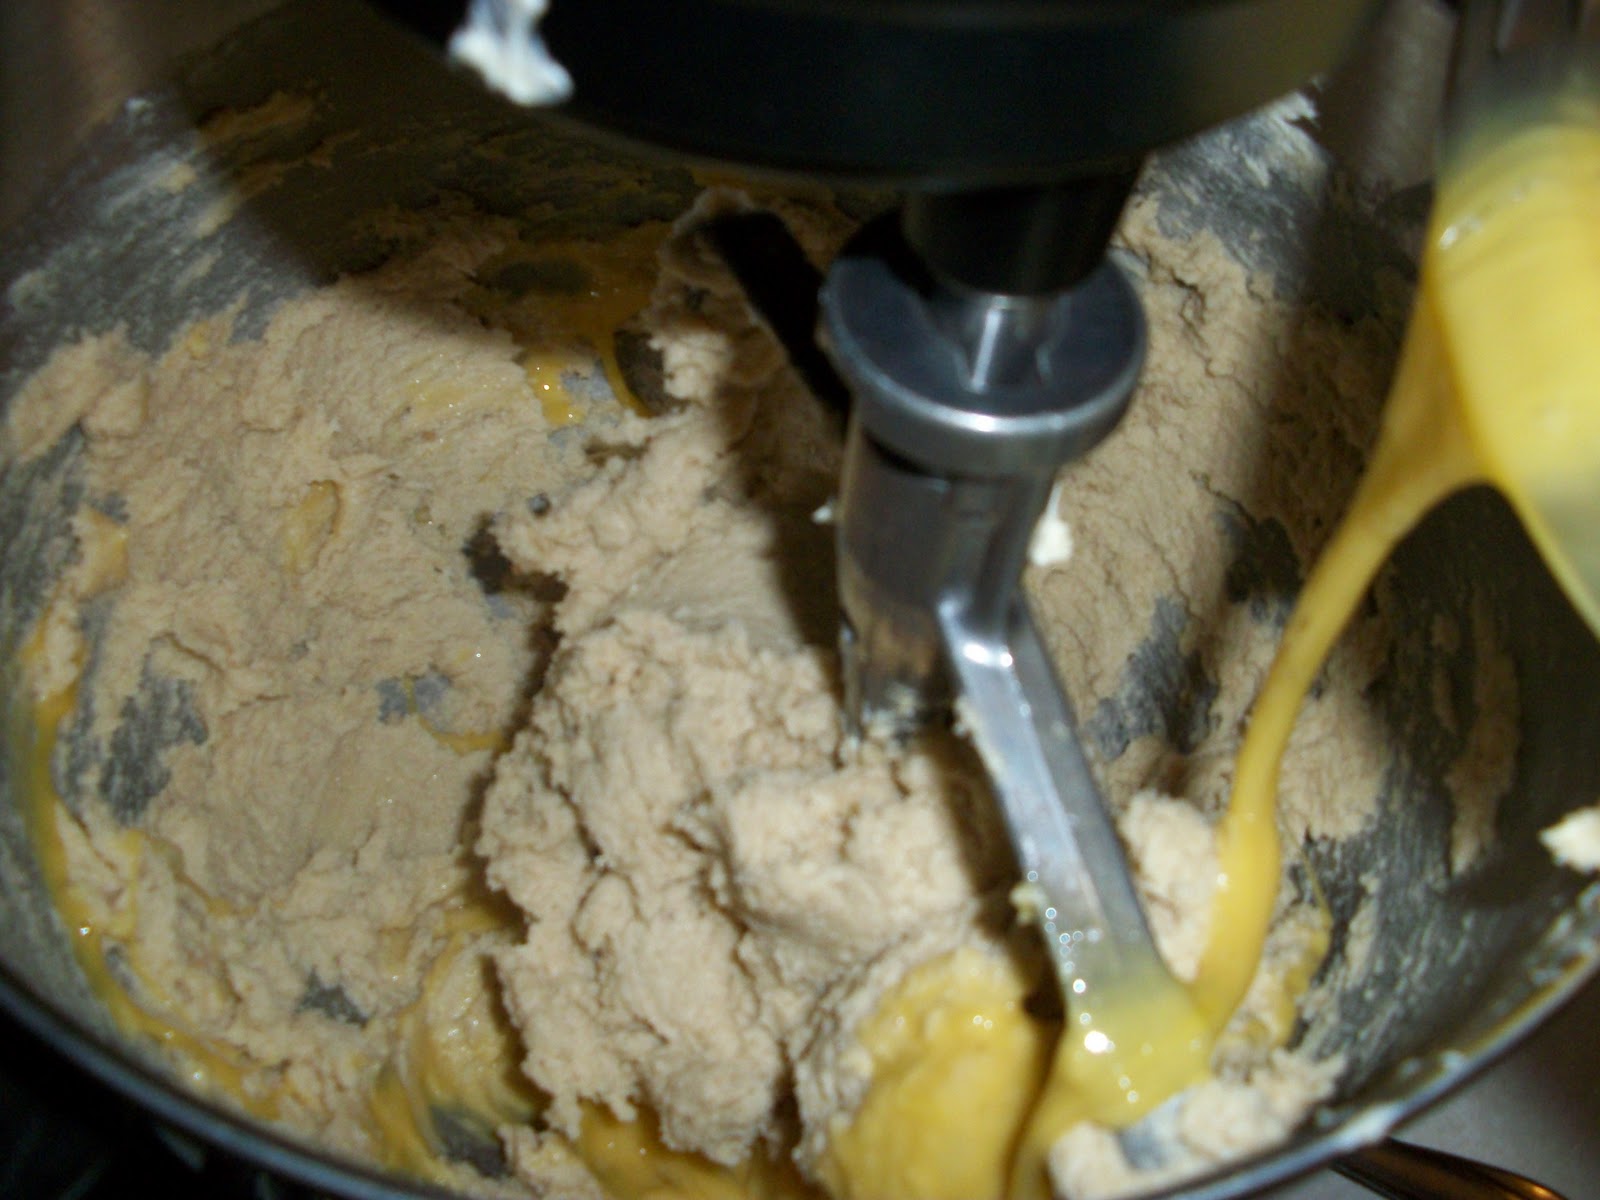
Combine all ingredients except chocolate and oil in a mixing bowl - I like my stand mixer of course, but this is totally doable by hand. If you choose the power tool option, layer your ingredients so that at least a 1/3 of the graham cracker is on top and go at the lowest speed to start, the melted butter can have a tendency to splash and powdered sugar likes to fly everywhere. After it starts to come together boost it up to medium or medium-high until it starts to firm up and come away from the sides of the bowl.


It should be wet looking but still firm, if it's exceptionally gooey add a little extra graham cracker to tighten it up. Again, differing from my mom, I weigh all my ingredients and make sure my graham cracker is dust, so I haven't encountered this problem near as often as she does. 

Now the fun part! Scoop (I use a #40 disher, or Oxo medium size) into even amounts and roll into balls. Place on a waxed paper lined cookie sheet and chill for at least an hour, or until firm. It makes a lot of candies, about 5 dozen. And if you're impatient, I think they're totally delicious plain and I'll munch on them now.


When you're ready to start dipping, melt your chocolate in a double boiler with the little bit of vegetable oil. The oil allows for a smooth and even coating of the candy. Double boilers come packaged as sets or you can just use a stainless steel mixing bowl and a regular saucepan. Make sure the bowl is bigger than the pan, you do not want the bottom to touch the water. Add about an inch of water to the bottom pan, set it over low heat, and slowly melt the chocolate while stirring frequently. When all the chips are ALMOST melted, pull from heat and stir until smooth. Dip the candy one at a time, completely coating in chocolate and then letting the excess drip back into the pan. I use a large serving fork, and tap it against the side of the pan to make sure the coat is even. The more you let it drip into the pan, the less of a puddle you'll have on the bottom of your finished candies. 


Place the dipped balls back onto a waxed paper lined cookie sheet. You will need about twice as much space for the dipped candy as for the rolled balls. I can fit one batch of balls onto one 18x13 cookie sheet, and then need two when I dip. If the balls won't come off your dipping tool easily, use a toothpick to slide them off gently. 
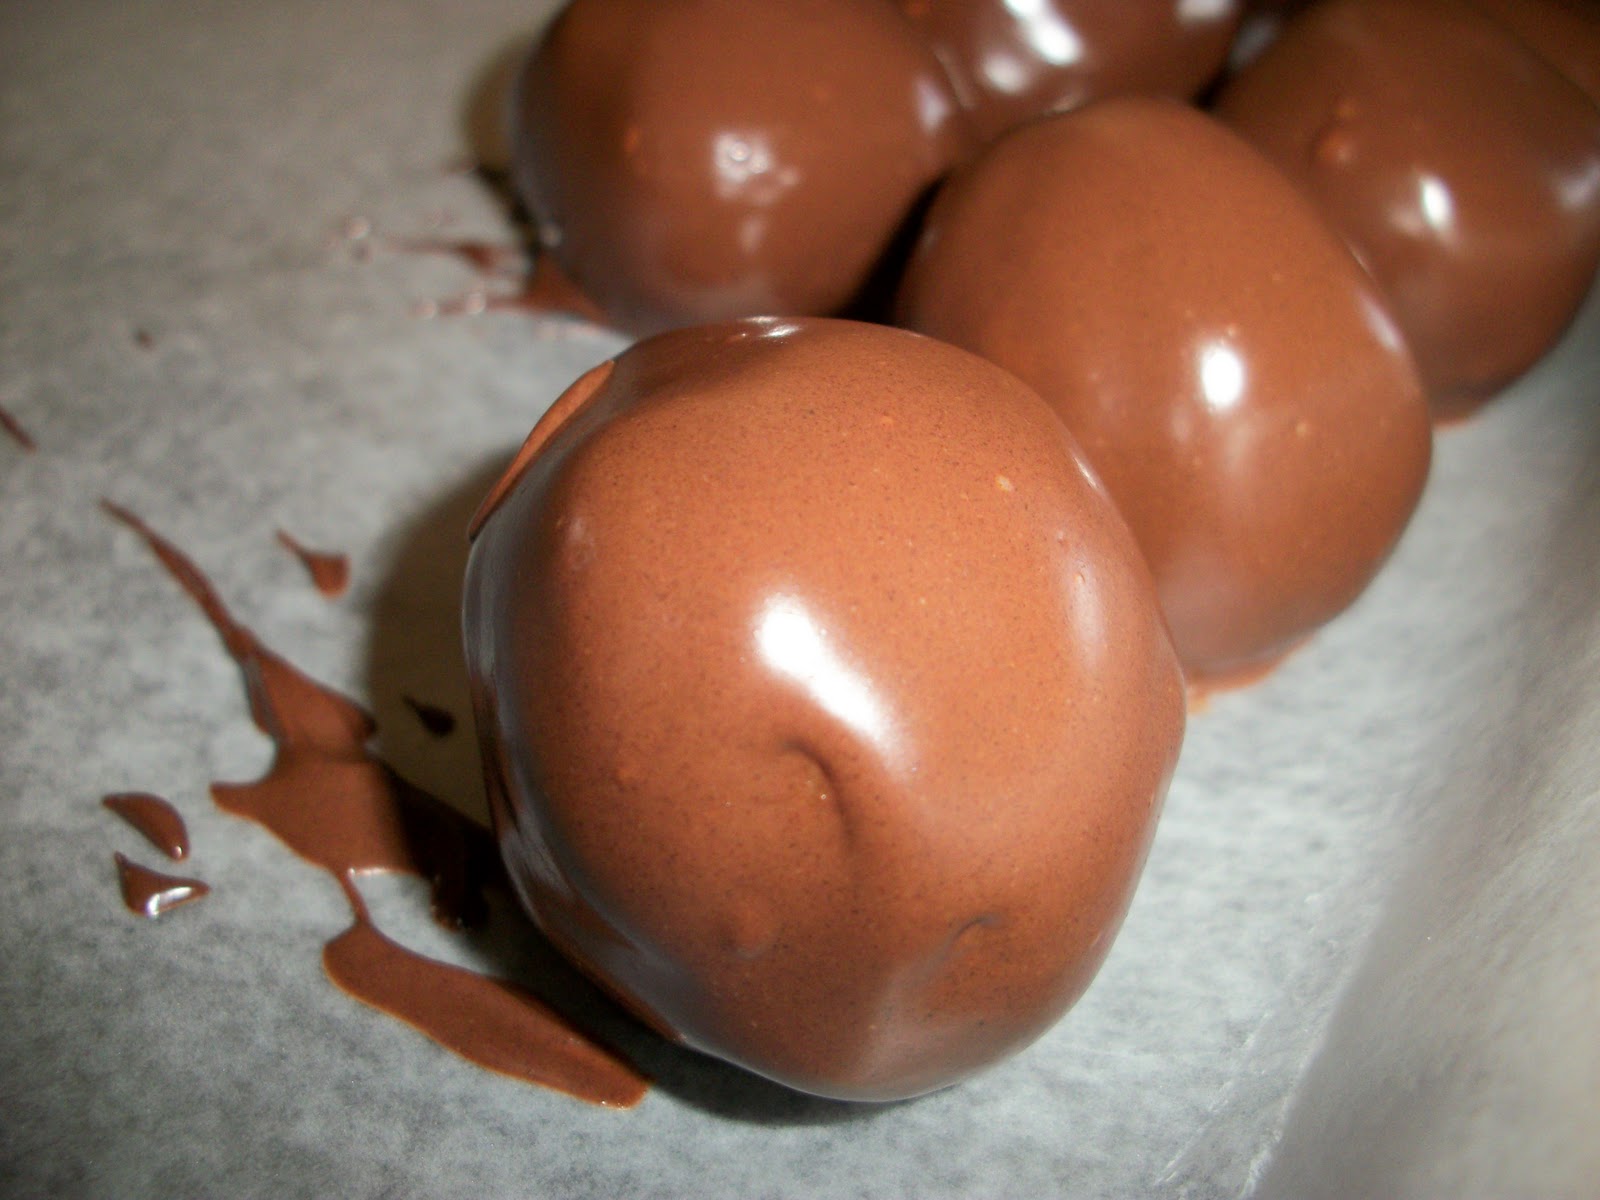


Ooohhh, shiny.

Now, just chill until firm then package as you please. Store in refrigerator. 


Enjoy.

Thanksgiving Dessert Marathon Week!

So, here's a quick preview of the many treats I'll be prepping for this week.

For the in-laws' Thanksgiving dinner: a double layer Apple Spice Cake, with a sweet apple pie filling and a cinnamon honey buttercream.

For my parents' Thanksgiving dinner: Chocolate Mousse Pie (3) and No-Bake Cherry Cheesecake Pie (2).

For our visit to out-of-town relatives: Cinnamon Streusel Coffee Cake, Cherry Pecan Oatmeal Cookies, and Mom's Peanut Butter Balls (at least I did that one last week, whew).

Sound exhausting? You bet. Sound typical of me? Most definitely. No guarantees I'll have posts up by Thanksgiving, but I'll get to them as fast as I can. A girl's gotta breathe.

Have a delicious Turkey Day!

Sunday, November 21, 2010

Banana Coffee Cake


So having indulged in a super low price on bananas, I had a couple bunches of nicely ripe bananas sitting on my counter. Therefore this week's recipe was dictated - banana.

But what? Banana muffins, banana cake, banana cookies... So many options, but only time for one.

I turned to my favorite baking tome, the Taste of Home Baking Book, and started flipping. I saw this recipe for Banana Coffee Cake, and it caught my eye. I had never actually done a coffee cake before (bizarre, I know), and this one seemed easy and yummy, and best of all I had everything on hand. Being me, I couldn't resist a few alterations - a nice streusel topping and a sweet icing - it didn't seem like a coffee cake without it.

The result? A soft, moist, tender cake with a little cinnamon kick and lots of yummy chewy pecan chunks. It reminded me of my mom's banana nut muffins - which were more a cake then a muffin, taken from an old banana bread recipe. A solid recipe which will go into my file for future reference.

Also excuse the lack of starting photos, I got distracted. But refer to my cookie recipes for more on the Creaming Method.

Banana Nut Coffee Cake
Adapted from Taste Of Home: Baking Book


Cake:
8 oz Cream Cheese, softened
4 oz Butter, softened (1 stick)
10 oz Sugar
2 Eggs
1 cup Banana, 3 medium ripe bananas pureed
1 tsp Vanilla
9 oz Flour
1 1/2 tsp Baking Powder
1/2 tsp Baking Soda
1/2 tsp Cinnamon
2 oz Pecans, chopped

Topping:
4 oz Butter, softened (1 stick)
4 oz Brown Sugar
4 oz Flour
1/2 tsp Cinnamon
2 oz Pecans, chopped

Icing:
8 oz Powdered Sugar
2-4 tbsp Milk
1/2 tsp Vanilla

In the bowl of your mixer beat the butter on medium for a minute, then add cream cheese. When the mixture is beaten fairly smooth, add the sugar and cream until light and fluffy. Lightly beat eggs with vanilla, slowly add to the creamed mixture with mixer on low. Add the banana puree. Mix together flour, powder, soda, and cinnamon. Add to the bowl slowly, in stages, allowing it to incorporate before adding the next amount. On lowest speed add in pecans and allow to fully mix. Please do not overmix batter, will create a tough cake. Pour into a sprayed 9x13 pan, and spread evenly.


Now make your streusel topping. Cream together your butter and sugar, then add your flour and cinnamon all at once. Mix until the mixture becomes crumbly, then throw in the pecans. Sprinkle liberally over the top of the cake. 


Bake at 350 degrees for 30-40 min, or until toothpick comes out clean. Cool completely, then prepare your icing. Put your sugar in a bowl, then add your vanilla. Slowly whisk in milk until desired consistency, it will not take very much at all because you want a thick icing. Whisk until smooth. You can either put it in a piping bag (which I did) or drizzle it with a spoon.


Mmmmmm. Golden brown and delicious. 


Look how moist that is, and all those yummy pecans and that sweet icing... 

Tuesday, November 16, 2010

Snickerdoodles


To be honest, I was never really a snickerdoodle person. I always thought sugar a little dull, and wasn't a huge cinnamon person either. But ever since we started dating, my husband has bugged me to make them for him. Now, 7+ years later, I finally did. And he didn't really like these, go figure.


I started with this recipe: Snickerdoodles, and converted to weight measures. I doubled the batch, added 1/2 tsp cinnamon to the dough, and did 1/2 cup sugar to the 2 tsp cinnamon in the topping. I barely got 3 dozen out of the double batch, which was odd even though I do large cookies. I have to say, they were really tasty, but not quite what I expected. The cookie itself was nice and moist and chewy, but I didn't get quite the crackle from the topping that I expected. They also spread out a lot, ending up rather thin. This stumped me a bit, because I didn't even flatten them and I baked them chilled, which prevents spread. So why didn't I get the puffy beauties pictured there? Not sure. I plan on making them again, probably with a few alterations.

Snickerdoodles
Adapted from JoyOfBaking.com

22 oz Flour
1 tsp Salt
1 tsp Cinnamon
4 tsp Baking Powder
1 lb Butter
24 oz Sugar (1 lb 8 oz)
4 Eggs
2 tsp Vanilla

Topping:
1/2 c Sugar
2 tsp Cinnamon

This recipe uses the Creaming Method. For pictures and details, check out Chocolate Chip Cookies.

In a stand mixer with paddle attachment, beat the butter until smooth, then add the sugar and beat till light and fluffy. Scrape bowl.


Above: Beaten butter. Below: Creamed butter and sugar


Beat together the eggs and vanilla in a small bowl, then add slowly drizzle into the butter mixture with the mixer on low. Scrape bowl.


Above: With egg added. Below: Finished dough. 


Mix together flour, baking powder, salt, and cinnamon in a bowl. Add to the mixer in stages, allowing the previous addition to incorporate before adding more. Mix until you have a smooth dough. If it's too soft, refrigerate for a bit until it firms up. Portion the dough out with a disher, I used my large Oxo cookie scoop but that did seem a bit big, I'd try their medium size or a #40 disher. Roll into balls and coat with the topping mixture.


I then froze my dough, and did not flatten it. I baked it at 400 degrees for 15 min, rotating halfway through. Pull them out when they are golden brown around the edges but still soft in the middle. Cool on a wire rack, or on wax/parchment paper on a counter.


Tasty, sweet and cinnamony. Will definitely try again.


Chocolate Chip Cookies


You would think that a baking obsessed woman like I am would have many fond memories of crafting an endless variety of goodies from scratch with her mother and grandmother. Especially hailing like I do from the Midwest. Well, I did have many wonderful moments in the kitchen with my mom, but "scratch" and "variety" were not well known there. My mom, sadly, did a lot of her baking from boxes and mixes. I can count on one hand the number of recipes we created from scratch - chocolate chip cookies, peanut butter balls, banana nut muffins, and cinnamon rolls. My favorite was the cookies, and by the time I was twelve I had taken over control of the cookie-making process. I was very particular about how the margarine and sugar were mixed, how my flour was measured, how they were dolloped onto the cookie sheets. I received a lot of praise for my cookies, and they were my signature item.

Then, I went to college, discovered the Food Network Channel and a man called Alton Brown. I realized that all my quirks from childhood had a scientific basis - beating the fat and sugar well, adding extra brown sugar, thoroughly combining the eggs, etc. And he showed me the importance of weighing ingredients, and how a stand mixer is really the only thing that can properly cream butter, and how a disher will create even cookies. He has taught me a lot, and with his aid I have finally perfected my chocolate chip cookies. I may have started with the familiar recipe on the back of a yellow bag, but I have played with amounts and methods until I was satisfied. Warning, this is a large batch - it makes 4 dozen of my large cookies. But the beauty of this is you freeze the scoops of dough, so you can bake off fresh cookies whenever you want.

Chocolate Chip Cookies

1/2 lb Butter, softened (2 sticks)
1/2 lb Margarine (2 sticks)
275 g Sugar
300 g Brown Sugar
4 Eggs
2 tsp Vanilla
675 g Flour
12 g Baking Soda (2 tsp)
12 g Salt (2 tsp)
24 oz Chocolate Chips (semi-sweet)

Beat butter in stand mixer with a paddle attachment on medium speed until broken up and pliable. Add margarine and beat until well blended. Add the sugars and beat until the mixture becomes light and fluffy, gaining volume and a consistent texture, scraping bowl as necessary.


Butter and margarine beaten together


After adding the sugar, this is what you're looking for

Scrape down the bowl. In a separate bowl, lightly beat together eggs and vanilla. With mixer on low, drizzle in the egg mixture. Stop and scrape the bowl, then mix together well. 


Egg goes in... 


Yucky looking but... 


Now it's nice and smooth. 

In another bowl mix together flour, salt, and baking soda. You can sift, but my confession is I have no patience for sifting, I just try and stir it together thoroughly. Add the flour mixture to the mixer in stages, at least 3-4 installments, stopping and scraping occasionally. Try and stop once all the flour is blended in, over-mixing leads to tough cookies. Turn mixer on the lowest speed and add chips, letting it run for a minute or two to make sure they're distributed evenly. 


Starting to add the flour


The finished batter. See how light and smooth it is?


Mmmm, chocolate. 

Scoop with a #20 disher (I use an Oxo Good Grips large cookie scoop) onto cookie sheets lined with wax or parchment paper. Go ahead and fit as many as you can on one sheet, this is going in the freezer. After they're nice and solid, pop them in a ziploc bag with a label and date, and freeze for up to 3 months. When you're ready to enjoy, place frozen scoops on cookie sheets and bake at 375 degrees for 13-15 min, rotating the pan halfway through the bake time. If you have the foresight, letting them thaw in the refrigerator will give you a slightly more even bake. Pull cookies out a little before you think they're done, they continue to bake once they leave the oven. I look at the centers of the cookie, and once it loses the shine but still looks a little soft I pull them out. Cool on a cooling rack or wax paper. 


A Little Theory...

If you feel up to learning a bit of the method behind my madness, read on. There are several key points to making good cookies - not just chocolate chip, but oatmeal raisin and peanut butter and snickerdoodle and on and on. It can also be applied to a lot of cakes. It's called - the Creaming Method. The basis of it is the creaming (duh) of butter and sugar together. It's why a stand mixer is kinda important - it's hard to really beat up the butter with a hand mixer or by hand. Butter temperature is important too - too hard and it won't blend nicely, too soft and it starts to melt. It should just give to pressure when you squeeze the stick. What happens is the sugar punches little holes into the soft butter. This creates little uniform bubbles later on in the batter, and leavens a little by mixing in air. Do not underestimate this! Mixing the eggs together separately lets them incorporate into the batter easier, and helps keep the smoothness and texture going. Adding the flour in stages lets it get absorbed slowly, but over mixing also leads to gluten and a tough cookie. If you want a really nice crumb and melt-in-your-mouth feel to the cookie, pay attention to the mixing. 

A little notes behind my specific ingredient ratio, as well. I use a mixture of both butter and margarine because they serve different purposes. Butter has great flavor, but melts easier and therefore makes a thinner cookie. Margarine keeps it nice and puffy. The higher amount of brown to white sugar makes a chewy, moist cookie. Also, baking with cold dough keeps them high and puffy as well. If you plan on baking off the whole lot, just chill it for at least an hour in the refrigerator. I keep mine frozen, and bake off 6-12 at a time when I feel like it. Frozen dough lends to a little more uneven bake - pretty gooey in the middle when the edges are done. I prefer mine that way, but it's your call. Thawing them in the fridge or on the counter for 10 min would be fine too.

If you want to play with your cookie recipe too, check out Alton Brown's "Three Chips for Sister Marsha" (Ep. 34) on  Good Eats Fan Page. He explains a lot of what I did here, and if you prefer a thin, chewy, or puffy cookie he's got the tips to get you there.